
Il existe de nombreux articles sur Internet qui expliquent le remoting PowerShell entre Windows et Linux et je propose ici d’en faire une synthèse qui vous permettra de construire votre propre environnement de tests grâce à AutomatedLab et Hyper-V (par extension à Azure également avec peu de modifications) et de vous connecter sans mot de passe via du PowerShell Remoting (via du SSH Tunneling) entre les machines Windows et Linux (dans les deux sens)
Nous aurons besoin d’une machine Windows 10. Je vous propose d’utiliser le lab AutomatedLab suivant (Domaine contoso.com avec un cotrôleur de domaine (DC01 – Windows Server 2019) et une machine cliente WIN10 (Windows 10). Le nom WIN10 est utilisé dans les scripts utilisés dans cet article.
Nous aurons également besoin d’une machine sous Linux. Je vous propose de vous référer au lien suivant How to create an Ubuntu VM on Windows 10 – Thomas Maurer qui explique très bien comment en avoir une rapidement grâce à la fonction « Quick Create » d’Hyper-V.
Lors de la rédaction initiale de cet article j’ai choisi la version 18.04.3 d’Ubuntu qui prenait en charge le mode « Enhanced Session » d’Hyper-V (ce n’était pas encore le cas pour la 20.04) et j’ai appelé la machine UBUNTU (nom utilisé dans les scripts utilisés dans cet article).
Mes machines WIN10 et UBUNTU sont toutes deux connectées au « Default Switch » d’Hyper-V (disponible sous Hyper-V/Windows 10)
Pour des raisons de simplicité j’ai choisi les mêmes comptes et mot de passe sur les deux environnements (administrator / P@ssw0rd)
Si vous souhaitez prendre la machine UBUNTU en RDP, il suffit de modifier l’entrée suivante dans le fichier /etc/xrdp.ini (Plus de détails ici) : use_vsock=true ==> use_vsock=false et de redémarrer la machine UBUNTU. Ensuite vous pourrez utiliser RDP (attention à ne pas avoir un client Hyper-V Virtual Machine Connection ouvert en même temps). Si vous souhaitez utiliser RDCMan (et ce malgré la faille CVE-2020-0765 – Security Update Guide – Microsoft – Remote Desktop Connection Manager Information Disclosure Vulnerability) j’ai mis à disposition le fichier suivant qui se connecte aux trois machines (DC01, WIN10 et UBUNTU) en RDP.
Une fois les trois machines en place (et inter-connectées), il suffit de dérouler les scripts suivants :
- Pour une connexion WIN10 ==> UBUNTU
- Sur UBUNTU : Install-SSH-PowerShellCore.sh
- Note: Vous pouvez faire un copier/coller du fichier grâce à RDP et ensuite faire un chmod +x pour avoir les droits d’exécution).
- Ce script effectue les tâches suivantes
- Mise à jour des composants de l’OS.
- Installation de OpenSSH client et server
- Autorisation du flux SSH au niveau du Firewall
- Installation automatisée de PowerShell via le script https://aka.ms/install-powershell.sh
- Modification du fichier /etc/ssh/sshd_config pour
- Mise à jour des paramètres PubkeyAuthentication, PasswordAuthentication et RSAAuthentication à yes.
- Rajout du sous-système PowerShell
- Redémarrage du service SSH.
- Sur WIN10 : Install-OpenSSH-PowerShellCore.ps1
- Ce script effectue les tâches suivantes
- Installation de OpenSSH client et server
- Installation automatisée de PowerShell via le script https://aka.ms/install-powershell.ps1
- Création d’un lien symbolique C:\pwsh vers le répertoire d’installation de PowerShell 7+ (à cause des espaces du répertoire de base – Normalement C:\Program Files\PowerShell …)
- Configuration du service SSH en automatique et démarrage.
- Autorisation du flux SSH au niveau du Firewall
- Modification du fichier %ProgramData%\ssh\sshd_config file pour
- Mise à jour des paramètres PubkeyAuthentication, PasswordAuthentication et RSAAuthentication à yes.
- Rajout du sous-système PowerShell
- Modification de la configuration du fichier ssh_config pour désactiver le fichier administrators_authorized_keys dédié aux administrateurs comme expliqué sur https://stackoverflow.com/questions/16212816/setting-up-openssh-for-windows-using-public-key-authentication
- Redémarrage du service SSH
- Génération des clés SSH : Le mot de passe du compte administrator sur UBUNTU vous sera demandé deux fois (et plus jamais après) pour la configuration des clés SSH sur cette machine
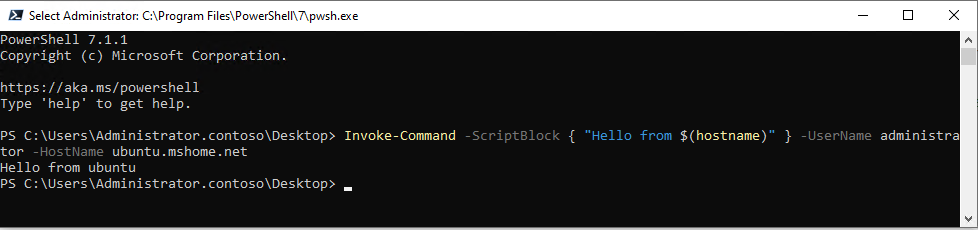
- Une ligne de commandes sera copiée dans le presse-papiers qu’il faudra ensuite coller dans la fenêtre PowerShell (7+) qui s’ouvrira. Le résultat sera le suivant :
- Ce script effectue les tâches suivantes
- Sur UBUNTU : Install-SSH-PowerShellCore.sh
- Pour une connexion UBUNTU ==> UBUNTU (L’étape précédente étant un prérequis)
- Sur UBUNTU : Configure-SSH.sh
- Note: Vous pouvez faire un copier/coller du fichier grâce à RDP et ensuite faire un chmod +x pour avoir les droits d’exécution).
- Ce script effectue les tâches suivantes
- Génération des clés SSH : Le mot de passe du compte administrator sur WIN10 vous sera demandé deux fois (et plus jamais après) pour la configuration des clés SSH sur cette machine
- Appropriation (via chown) du fichier ~/.local/share/powershell/PSReadLine/ConsoleHost_history.txt pour éviter un access denied
- Une ligne de commandes sera copiée dans le presse-papiers qu’il faudra ensuite coller dans la fenêtre PowerShell (7+) qui s’ouvrira. Il faudra répondre ‘yes’ à la question demandée.
- Sur UBUNTU : Configure-SSH.sh

-
-
-
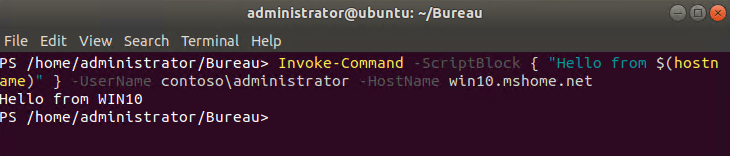
- Le résultat sera le suivant :
-
-
Vous avez maintenant configuré le PowerShell (7+) Remoting via du SSH Tunneling entre Windows et Ubuntu dans les deux sens 🙂

There are many articles on the Internet that explain PowerShell remoting between Windows and Linux and I propose here to summarize it that will allow you to build your own test environment thanks to AutomatedLab and Hyper-V (by extension to Azure also with few modifications) and connect without password via PowerShell Remoting (via SSH Tunneling) between Windows and Linux machines (in both directions)
We will need a Windows 10 machine. I suggest you use the following AutomatedLab lab (Contoso.com domain with a domain controller (DC01 – Windows Server 2019) and a WIN10 client machine (Windows 10). The name WIN10 is used in the scripts used in this article.
We will also need a machine running Linux. I suggest you refer to the following link How to create an Ubuntu VM on Windows 10 – Thomas Maurer which explains very well how to have one quickly thanks to the “Quick Create” function of Hyper-V.
During the initial writing of this article I chose Ubuntu version 18.04.3 which supported Hyper-V “Enhanced Session” mode (this was not yet the case for 04.20) and I called the machine UBUNTU (name used in the scripts used in this article).
My WIN10 and UBUNTU machines are both connected to the Hyper-V “Default Switch” (available under Hyper-V / Windows 10)
For reasons of simplicity I chose the same accounts and password on both environments (administrator / P@ssw0rd)
If you want to take the UBUNTU machine with RDP, just modify the following entry in the /etc/xrdp.ini file (More details here ): use_vsock = true ==> use_vsock = false and restart the UBUNTU machine. Then you can use RDP (be careful not to have a Hyper-V Virtual Machine Connection client open at the same time). If you want to use RDCMan (despite the flaw CVE-2020-0765 – Security Update Guide – Microsoft – Remote Desktop Connection Manager Information Disclosure Vulnerability) I have made available the following file which connects to the three machines (DC01, WIN10 and UBUNTU) with RDP.
Once the three machines are in place (and interconnected), all you have to do is run the following scripts:
- For a WIN10 connection ==> UBUNTU
-
- On UBUNTU: Install-SSH-PowerShellCore.sh
-
-
- Note: You can copy / paste the file using RDP and then do a chmod + x to have execution rights).
- This script performs the following tasks
- Update of OS components.
- Installation of OpenSSH client and server
- Authorization of SSH traffic at the Firewall level
- Automated PowerShell installation via https://aka.ms/install-powershell.sh script
- Modification of the /etc/ssh/sshd_config file
- Updating PubkeyAuthentication, PasswordAuthentication, and RSAAuthentication settings to yes.
- Adding the PowerShell Subsystem
- Restarting the SSH service.
-
-
- On WIN10: Install-OpenSSH-PowerShellCore.ps1
-
-
- This script performs the following tasks
- Installation of OpenSSH client and server
- Automated installation of PowerShell via the script https://aka.ms/install-powershell.ps1
- Creation of a symbolic link C:\pwsh to the installation directory of PowerShell 7+ (because of the spaces in the home directory – Normally C: \ Program Files \ PowerShell…)
- Configuration of the SSH service to automatic startup and startup.
- Authorization of SSH traffic at the Firewall level
- Modification of the %ProgramData%\ssh\sshd_config file
- Updating PubkeyAuthentication, PasswordAuthentication, and RSAAuthentication settings to yes.
- Adding of the PowerShell subsystem
- Modification of the configuration of the ssh_config file to disable the administrators_authorized_keys file dedicated to administrators as explained on https://stackoverflow.com/questions/16212816/setting-up-openssh-for-windows-using-public-key-authentication
- Restarting the SSH service
- Generation of SSH keys: You will be asked for the password of the administrator account on UBUNTU twice (and never after) for the configuration of the SSH keys on this machine
- A command line will be copied to the clipboard which will then have to be pasted in the PowerShell (7+) window that will open. The result will be as follows:
- This script performs the following tasks
-
- For a UBUNTU ==> UBUNTU connection (The previous step being a prerequisite)
-
- On UBUNTU: Configure-SSH.sh
- Note: You can copy / paste the file using RDP and then do a chmod + x to have execution rights).
- This script performs the following tasks
- Generation of SSH keys: You will be asked for the password of the administrator account on WIN10 twice (and never after) for the configuration of the SSH keys on this machine
- Appropriation (via chown) of the ~/.local/share/powershell/PSReadLine/ConsoleHost_history.txt file to avoid access denied
- A command line will be copied to the clipboard which will then have to be pasted in the PowerShell (7+) window that will open. You must answer ‘yes’ to the question asked.
- On UBUNTU: Configure-SSH.sh
-
-
-
- The result will be as follows:
-
-
You have now configured the PowerShell (7+) Remoting via SSH Tunneling between Windows and Ubuntu in both directions 🙂
Laurent.